Friday, October 28, 2011

Halloween Package for my Bunny friend

My friend, Bunny loves Halloween. This year, I saw some really cute stuff so I sent her a Halloween package. I don't know why but I have been bit by the Halloween spirit. :)

Pre-halloween package package.

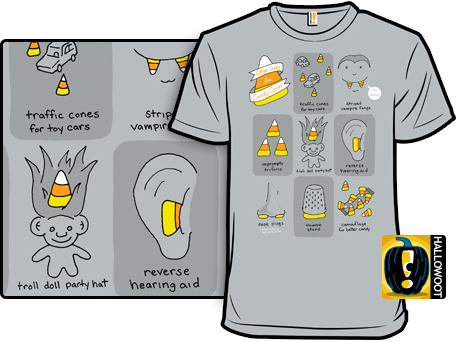
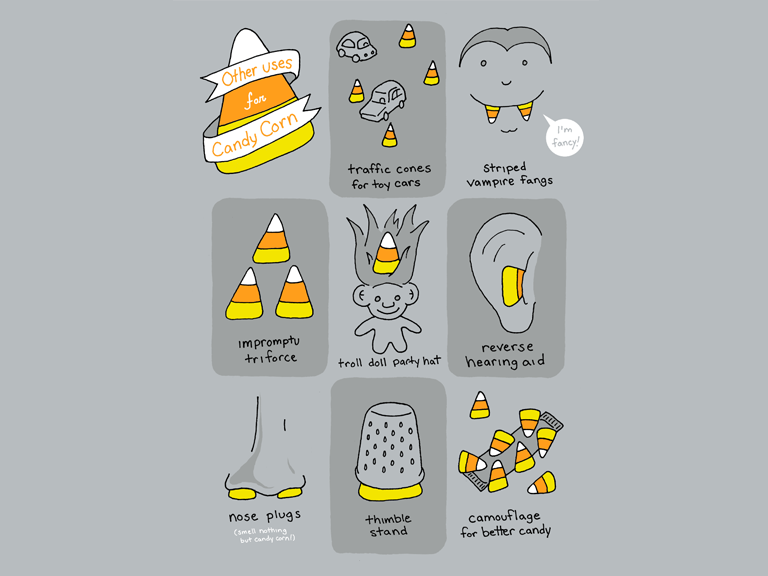
Other Uses for Candy Corn

Other Uses for Candy Corn

This shirt is from an online store called, Shirt Woot. They only have about 20 shirts on sale and every so often the bottom sellers get discontinued. This shirt was sadly one of them.  I just read from an email she sent that she loves candy corn so I saw this shirt and thought it was perfect. Hopefully, it will fit. : / If it doesn't, I hope it will make a cute pillow. hehe

Actual Halloween Package:

Pot Holders Set


This bunny loves to bake so I thought it would be a cute way to keep your paws from burning. :) Every time I look at them, it makes me want to bake something more Fall...hehe

Halloween and Thanksgiving cookie cutters
I think she was eyeing some cookie cutters but since we are just about on the other side of the country from each other, hopefully she doesn't already have these. :) You can't have too many cookie cutters. :) I want to find some stainless steel ones and make eggs or pancakes in weird shapes. Hmm...I wonder if it would work...would the heat get to the sides? Can't wait to try. :)

The Halloween card.
That candy corn is a necklace. :) Isn't she a cutie?

Inside of the card
But what really got me was the inside. Rachel is a real sweetie. I would mistaken her for a treat. :)

Brooches
I am sending the brooches I worked so hard to make for her safe keeping and use. :) I know she will take care of them and appreciate them for the rest of her life. :) If only i could get her to send me some of her soul in the form of pictures of her wearing them...muahahah!


Happy Halloween Bunny!

Monday, October 24, 2011

A Bunny Halloween Package

I just received a package from my good friend, Rachel. Yeep! :) I love receiving packages from her! It is always filled with really cute goodies that I love. :) It's on her blog as well. :)

Cute Halloween Tape
I really like fun tape like this and I have some cute panda tape but I don't want to use them and don't know when to use them...hehe This really puts me into the spirit of Halloween. :)

Ghost cup
I laugh when I see this because the expression is so funny but I am also a little wary because I am afraid of ghosts...hehe I don't like scary movies or tv shows at all.

Ghost beanie baby, I love Vampires notepad, and cute container.
This ghost is really cute. I like him. :) And I love the notepad...I am team Cullen. hehe The container works well for me as a candy holder right next to my front door. It works so well that I really want to eat a piece of candy every time I walk by. :( I just remind myself that there are some yummy fruit in the fridge if I really wanted something sweet. Control, need control....

Cute packaging
I love package wrapping...geeky, I know. :p I love unwrapping packages too. :) Sometimes the packaging is too cute to unwrap. That is where I have a hard time deciding. hehe

2 Cross stitch magazines, book, card, and Body Parts Sushi Roll candy
I think my friend is trying to get me into cross stitching more with the magazines. She might have just done it. We will see if I can get any of the x-mas ornaments done. I have never finished a cross stitch project. O.O I know crazy...

The body parts sushi candy is so funny. I love it! I might have to actually eat them but only one piece a day.

 I love the card. It is actually has a sparkily background under the pumpkin cut out which is really need. Papyrus has done it again with another beautiful card. 

The book is a part of this cute steampunk series with a heroine. If you like Sanctuary because of Magnus, then you should read this series. :) Sometimes it is hard to visualize all the cute tech though. I wish they would have more pics of just the invented stuff.

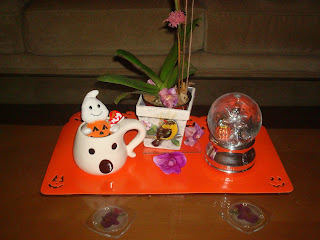
Halloween display
My mom had the jack-o-lantern place mats and the Casper water globe. The cup and friendly ghost is cute with it. I need to get out the cute Halloween stuff from previous years from my friend, Bunny, and put them out to enjoy. :)

Thank you so much Bunny!! Love u! Miss u!

Sunday, October 23, 2011

Brooch Bonanza

I have been thinking about, tinkering with, making, and finishing brooches. Because that is what my friend, thewanderingbunny, wears the most so I thought I would get in some practice. I have never really made any brooches before. I like bracelets because they allow me to finish the piece in one night. I think my next batch will be earrings to get her to wear them more but I still don't like wire work that much. :) I have made 2 new brooches tonight. One is for Halloween and the other is in a more Victorian style that I have been meaning to try. I hope you guys like them. :)

Victorian style Butterfly Cameo Brooch
I had found and bought this butterfly cameo to make a brooch out of it, but it was a pendant. After racking my brain for a couple of days, I had 2-3 versions of this brooch in my mind. I was going to add tulle to the background to make the cameo pop more and to hide the pin finding because the finish does not match. But all of my tulle and fabric is in storage. Then I was going to dangle some beads like long icicles along the side and back. I really wanted to hang something from the bottom but this one is not made for it. So, I went online and looked at a lot of images of different brooches with hanging pendants or cameos. A lot of them had chain attached in layers with beads hanging down.

This is my version. This finding only has 1 loop from which I hung the cameo. I went through my stash of chain and found this nice star and rhinestone one in the right finish for the cameo. My mom bought it for me from Taiwan. I attached it to the ends with jump rings. I then added the purple crystals for color and to hide some of the wire. I wrapped the finding with wire strung with black seed beads to cover up the silver finish of the pin finding. This brooch was very frustrating because of all the wire work and the jump rings kept slipping but I am happy with how it turned out. I think it will be my one and only like it though. Too much work and fustration. :P

Here is my Halloween themed brooch. I started making it as a bracelet from this free pattern called Going Batty. I don't really do a lot of netting and I realized why when I was making the bracelet. Reading the pattern was making my eyes cross. I also did not really like the colors I used so I stopped and dropped the project. Well, one night I couldn't get to sleep and had a light bulb, ding! I took what I had made so far and zipped it up into a cylinder. That took so much work because I had filled in one bat but had to undo all the stitching to redo one area where a bat was going to be started. That was frustrating but I worked through it by thinking it as a puzzle to work out. When I finally got done, I had to figure out how to zip the two sides together. It was just trial and error, if I had a plan I could have added another bat.

Finished cylinder
It looks actually pretty cool as a ring too. This one was too small to wear that way. Next time. :) 

Added structure
I added wire to the top and threaded on clear seed beads. I was going to do the bottom as well but liked the look of the points. This was a pain to do but kept the cylinder open. I also added a string of seed beads with a red bell at the end.

I think this would also be really cute as a pendant. And if you like big earrings or could scale it down, it would be cute as earrings but without the bell. Hearing a bell everywhere would drive me nuts.  

Finished Brooch
I didn't want to make it too fancy like the Victorian brooch so I added it to the coiless safety pin. I had to add a drop of glue to the end of the seed beads to stop them from sliding down. It is my unique creation, thought up from my subconsciousness. I don't think I have ever seen a brooch or pendant like it for that matter. :) Patent pending. :)

Now I know I am not good at and need more practice working with wire. Hopefully, making more earrings with help. :) Never Give up! Go go go!!!

Brooch Finishes

Over the last week, I have been focused on brooches. I was able to finish 3 brooches, more due to necessity than from actually being productive. :P

Finish # 1
I finished a brooch made out of zippers called, Black Zipper Flower. I had written about this in my Procrastination Made Me post. I gave it to my friend, Trinity, who made me really happy by promptly placing it into her hair. :)

Front view

Back view with pin and hair clip
I found these coiless safety pin at Joann's and fell in love with their versatility. With this pin, you could take it out if it bothers you while you are wearing it in your hair and you can adjust it to lay the way you want on your clothes. I then cut slits into the felt so that the hair clip could be taken out all together or you could switch sides. My friend wore the flower in her hair during the whole dinner and it didn't move an inch. Everyone was surprised when I pointed out that it was made with a zipper. :)

Finish # 2
I also finished my Fall Floral brooch on my previous post. I actually sewed the leaf to the flower and the pin back. I decided to leave it with only one leaf.

Front view

Back view

Side view
Yea, it did not turn out to remind me of fall at all but it is still a nice piece. Making this one taught me about colors, connecting pieces, and adding a pin back.

Panda's Tip of the Day:
Place your pin back a little further up towards the top of your piece. It will allow it to lay nicer when you wear it. I did not do it for this piece because that is where the pin back would be hidden from view. So now when someone wears it, the flower will be tilted forward a little.

Finish # 3
I had found this tutorial for making small crochet hearts. I made one to see how easy it really was. FYI, I have not touched a crochet needle in a couple of years so it took a little to get me back into the swing of things. As with riding a bike, it didn't take long for me to pick it back up. There was this weird hole so I just added this really bling and cute button. I think it adds a little classiness to something very homely. :)

Front view

Back view
 With the right findings and some good persuasive reason, I can finish what I started. hehe

Finish on!

Tuesday, October 18, 2011

Yummy Warm Apple Cider

I get feeds from Paula Deen's facebook page and today it led me to this yummy warm apple cider recipe on her blog. I just had to share it. I am going to try it once it gets a little cooler. :) I know it will definitely put me into the fall/winter mood. :)

image
Picture of the apple cider from the blog post
Here is the recipe from the blog:

Warm Apple Cider:
1. Fill a crock pot ¾ full of apple cider.
2. Add ¼ C brown sugar, 3 cinnamon sticks, 1 Tbs cinnamon sugar, a few dashes of nutmeg and pumpkin pie spice, and 4 large pieces of crystalized ginger (the secret ingredient!).
3. Add half a chopped apple (red delicious is my favorite) and a whole orange (peeled and in chunks).
**Your entire house will smell wonderful after making this yummy drink this fall!**

Thank you Martha Lee for this. :) There are two more recipes on the blog page too. :)

May we all live through this crazy holiday season. :) Good Luck!

Saturday, October 15, 2011

October is Breast Cancer Awareness Month

October is the start of the holiday season for most people, but not for me. I like to think September is because that is the month of my birthday. :) October is also breast cancer awareness month, contains Columbus day, and many others which you can read about here. Why do I tell you all of this? Because it helped me figure out how to finish my pink experimental bracelet as seen in my post called Experiments

Opportunity Knocked
 The bracelet was pink and Breast Cancer Awareness is symbolized by the color pink. Therefore it was logical that I finish this bracelet as a Breast Cancer awareness bracelet. I just added an awareness ribbon charm to the middle of the bracelet. I think it would cute to do a rainbow bracelet and add ribbon for all the awareness ribbons and months. For a list of all the awareness ribbons and their colors, click here.

Finished bracelet
 I added a seed bead to every other space along the top and bottom edges to make a scalloped effect. I also finished off the sides with more seed beads, using the same stitch but leaving out the crystal.

Close up of the awareness ribbon
I didn't realize until just now that silver ribbon is Brain Cancer awareness, but I think it still works. I love how the slight shading in the pinks makes this bracelet more interesting. 

Christmas Eeyore getting into the spirit
I had recently read an article saying that we should make our Christmas present jewelry during November and give them out during Thanksgiving so that our friends and family can wear it though out the Christmas season. I say we need to start even earlier. Panda's Tip of the Day: start in September. Start making your Halloween jewelry and crafts in September so they can be enjoyed all October. During October, make your fall/Thanksgiving jewelry and crafts. Then during November, you can make and give the winter/Christmas stuff. Fall/Winter is a very busy time. It's always nice to stop procrastinating and get started early. hehe

Friday, October 14, 2011

For a friend's 30th Bday present

My friend's hubby wanted to do something special for his wife's 30th birthday. Since she loves scrapbooking, he decided to have all her friends make a page for a book as a present for her birthday. I think it is a very good and thoughtful idea. What a wonderful husband. :) This is a surprise, so shhh...hehe Don't worry..I made this page on 9-28-11 but I won't post this post until her birthday. :)

My addition to her scrapbook
 I have not scrapbooked for years. I don't even know where my supplies went to. A trip to Michael's remedied that. :) The thing is, the page could only be 8x8 inches. Dang, I had a hard time fitting everything I wanted to onto such a small page. I know you should leave room for writing something and dates and places but as you can tell from this blog, I am not that great of a writer so, I filled up the page mostly with pictures. :) 

For the picture on the top left corner, I took two pictures of each of us separately with our respective squirrels and flipped her's. Now it looks like we are both trying to feed the squirrels cupcakes. hehe And the top squirrel has a party favor...hehe. The bottom left picture was done by taking the color photo and print it out in sepia. Then I cut out the crown and the party favor from the color photo and glued it onto the sepia version. I raised the crown with foam dots. I had to add the streamers separately because they were cut out of the photo when it was taken New Years Eve. :) I couldn't fit in "Happy" so I just added a happy face. I hope the message gets through. :p 

Front of Birthday Card
I still had a bunch of stuff left since I bought supplies for a 12x12 inch page so, I decided to make her a birthday card. I didn't really know what to do with the front so I just added the sepia version of one of the photos from the scrapbook page. The New Years Eve photo would've been a better fit. Oh well...

Inside of the Birthday Card
I started making the card from the bottom inside panel. The paper is actually from a sheet of paper with stripes of different designs for St. Patty's day. I cut out which stripes I liked and just put them together. I decided to put this picture of the two of us to make it look kind of scrapbookish. The frame was needed to make it stand out from the background paper. Luckily the side panel had some blue that matched the my clothes. hehe I did end up writing a message for her on the bottom panel.

I had this cute picture of the birthday girl being goofy from when we went to the Mystery Spot in California. It was perfect to go along with the tower of cakes. I was going to leave the picture alone. It would of looked like she was asking if she was as tall as the cakes, but putting a candle in her hand makes it look like she is trying to be the cake, at least to me. hehe

Gift inside the card
I added a Michael's gift card to help keep her supplies stocked. hehe I was planning to put a blank frame in the center of the scrapbook page. I would put this card in the frame and then ask her to put a picture of the two of us celebrating her birthday together in the frame that the card would vacate. But I forgot that it was only an 8x8 inch page so, there was no room. I was going to the put the "Happy 30th Bday" message and my signature around the frame.

I am very jealous of home because for now, she has a room just for her scrapbooking. When I get my dream house, I will definitely have a craft room. Each wall of storage might have to be for a different type of craft. hehe

Front of Envelope
The card was too thick for the envelope so I had to make my own with the leftover paper. Isn't it cute? :) 

Back of Envelope
I added "hbd" aka happy birthday. It had to be in lowercase because I used up all the uppercase letters.

I think for now I will stick to beading. Scrapbooking and card making just takes too much out of me. hehe But at least I think I still got it. :)

Panda's Tip of the Day:
When you get that big sheet of sticker letters, I like to cut out the letters I will use, individually so that I can dry fit them on the page. It helps with placement and you know for sure that they will fit. The letter stickers are usually on clear plastic too so it really helps you visualize what it will look like. I did this for the other stickers as well, especially the big stickers. :)

Keep busy :) 

Tuesday, October 11, 2011

Catfish with a side of Asian

I was tired of waiting on my friend to stop being lazy and cook this catfish that I had bought, so I decided to do some research, online of course, and cook it myself. I did the same for the sides. My limiting factor was that I did not want to go buy supplies, so I only used what was already at home. It came out well, I think. :) 

Dinner plated
I used this Catfish Amandine recipie, not because of the name..hehe..but because I had just about everything except the lemon and almonds. I think that the flavors of the side dishes over powered the subtle flavor of the sauce for the fish. But the fish's flavor was still strong enough to be good. I actually started to rub the fish in the green bean sauce, which was really good too. Next time, I will replace the green beans with the fish in the recipe.

For the green beans, I had bought this bag of green beans that were already cleaned and trimmed. All you had to do is steam them in the bag. I have been on a green bean, sweet pea binge lately..hehe I was going to stir fry it Asian style but I found this Thai recipe for Green Bean and Shrimp. I didn't have shrimp but I liked the sauce. It was really good. The green beans were crispy but slightly under done because I didn't have the wok hot enough to fry them quickly. I will remember for next time.

Those "boobies" hehe are Roasted Garlic and Wasabi Mashed Potatoes. I combined a couple of recipes for this. You boil the potatoes and add butter, milk, wasabi paste, garlic, and salt and pepper. The wasabi over powered the roasted garlic sadly. It still tasted good but next time I would do one or the other, not both. I will try to roast another garlic bulb. Roasted garlic tastes really good but I found it very messy when I tried to squeeze the garlic out of the bulb. 

Yes, I was running around like a chicken with his head cut off. Yes, I have a pile of dishes in the sink, But no, I did not make a huge mess of the counters and stove. :) Hopefully, someone else will do the dishes for me since I'm the one who cooked dinner. :)

Don't wait for others. Cook on!

Sunday, October 9, 2011

Red Heart Chandelier Earring

I saw these earrings and fell in love. I don't know what it is about them, but I thought they looked very unique and pretty. I have been itching to make something like it and just recently was given the chance to try. My friend's birthday was just this weekend and I was stumped as to what to give her. She doesn't really wear jewelry but does wear earrings sometimes. And she likes her accessories to be red (like her laptop and cell phone) but I have never seen her wear red earrings. Needless to say everyone liked it and she said she would find a day to wear them. :) I thought I would share my version with you all. :) 


These earrings needed to be hung from something to show how it would hang. It is not flat so I was stumped until I saw my mom's beaded animals. I did not make the animals..hehe..that is just too much wire work. If I was to ever make something I like this, I would make myself a cherry blossom or plum blossom tree. :) The elephant was too short so this giraffe worked well. :)


Sorry for the bad pictures. The earrings were made last minute so the pictures were last minute. I literally made these, went to dinner with family, and had to run off to the birthday party. hehe Procrastination sucks..I don't know why I do it. :P

Red heart earrings
Instead of the circular bead cap they used, I was lucky enough to find a star link that worked well, at least I think so...hehe


It took overall about 2.5 hours to make these. I am not the best at wrapping wire and have been out of practice for a while now. Therefore, it probably took a bit longer than necessary. I have also been wanting to do earrings but the wire work is intimidating. Maybe this pair will break through and I'll make more earrings. :) 


I thought I would share the lanyard that I had made for my friend during school. She had accidentally broke it and it took me this long to fix it. :P I ended up cutting the lanyard in half and adding a magnetic clasp so that next time it got caught on something, it would not break.

I have problems with psyching myself out of doing certain things because I think I might not be able to do it but when I actually get to doing it, it is never that bad and works out. So, I say to you all, do something every week that you have been putting off. It feels great over coming your own fears and accomplishing your  goals! hehe Fight Fight Fight! Even if it's yourself..

Tuesday, October 4, 2011

Mom's Red Bean Mochi Bars

I have been craving my mom's red bean mochi bars for a couple of weeks and I finally got her to make it for me. I was actually asking her to teach me how to make it but I ended up making spaghetti and she made the dessert. hehe I got her to write down the recipe for me though so I would have it. :) 

Mom's Red Bean Mochi 
It smells so yummy! The smell permeates to the second floor too...drool...hehe My mom was saying how she over cooked it by 6min so the edges are too crunchy. It was still good. You see, my mom had to kind of remember how to make this, since she has not made this in years. Good job Mom's memory. hehe

The ugly but very yummy inside.
My mom didn't put enough of the mochi on the bottom and too much red bean paste so it came out looking ugly to her. It still tasted really good to me. The top is crunchy but the middle is sticky/chewy. I like the difference in textures. The red bean and mochi are both not too sweet. It was everything I remembered from childhood. :) I had two big pieces. :P

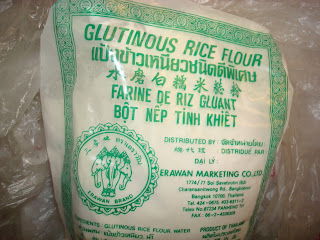
Rice flour to make the mochi part
My mom buys this brand. We get it from a Chinese supermarket named 99 Ranch. (Tip: you will have to pay for bags so bring your own) I did not realize that this is made in Thailand. :)

Sweetened Red Bean Paste
Yes, it is from a can but it is not that sweet and it is a lot easier than making your own paste. :) Yes, I had to lick the can just a little. hehe

She wrote down the recipe for me. :)
Now I am going to translate the recipe just for you guys. :)

Mix together:
1 bag of rice flour
3 Large Eggs
2 Cups of milk
1 cup of Vegetable oil
1 cup of white granulated sugar

Pour 2/3 of this mixture into a pan.
Add 1/2-1 can of red bean paste in globs randomly and evenly throughout the pan. You can just drop the globs of red bean on top of the mixture.
Pour the rest of the mixture on top of the red bean paste to cover.

Bake in a pre-heated 350 degree oven for 1 hour. Let cool. Cut and Enjoy. :) It will be sticky but not as sticky or chewy as mochi. :)

Doesn't every love their mom's and grandmother's recipes? It is really sad that more and more of these goodies are getting lost and not passed down. So, I DARE you ALL to take one day and learn just one recipe from the generation before you. It is a legacy that should not be lost in this day and age of fast everything. :)
Have fun! :)

P.S.
I forgot to tell you about my spaghetti dinner. I usually cook semi-homemade style. I took Prego spaghetti sauce added chili powder, red pepper powder, ground black pepper, garlic salt, chipotle seasoning, and paprika to make it spicy. :) I added sausage that I took off the skin and cooked like ground beef, mushrooms, and broccoli. Instead of spaghetti noodles, I cooked up wheat spiral pasta. I like it because 1. I don't like regular spaghetti noodles, I like thick spaghetti noodles 2. I am trying to eat healthy and 3. It holds the sauce better. :) Tip: add a little of the noodle water to the sauce, it helps to thicken the sauce with the starch from the noodles. :) You are also suppose to pull the noodles from the water 1min early from al-dente and put them into the sauce so it cooks the last min in the sauce and flavors the noodles more. :)

I love one pot well, here 2 pots but I love it when all my food groups are in one dish. The dairy is from the parmesan cheese you can put on top. :) I don't think it is because I'm lazy, per say...hehe I just like how it is easy. It is just like soup. I can put all of my food groups into a soup and it is really healthy. :)

Eat on!