Sunday, September 30, 2012

Happy Mid-Autumn Festival

Today, my family is celebrating the Mid-Autumn Festival. It is a Chinese, lunar calendar holiday where we get together with family, eat a lot of yummy food, light lanterns and eat Chinese moon cake. It is also called the Moon Festival because it is on a full moon. 


Another story and symbol of this holiday for us is the Rabbit on the Moon, instead of the Man on the Moon. If you want to read that story just click on this link and this link actually has a picture that shows how we see a rabbit on the moon. :) It's a cute story about rewarding sacrifice. 


This year I sent a moon cake and a cute bunny pin to my friend, Rachel. She posted about it on her blog too. :) This pin was inspired by the Rabbit on the Moon story. :)


I used art I found online to cut out the rabbit for the pin.


I love the yellow orange color of this moon so, I took yellow felt and dusted it with my pink blush. :) It gave me a very nice color for the moon. :) I also used the blush to give the rabbit ears and cheek some color.

I also want to show you what a Chinese Moon cake looks like. :) If you check out my friend's blog, she shows a more traditional style of moon cake. The filling is normally red bean, green bean, or taro. And it can come with or without a preserved duck egg yoke inside. I had sent my friend a pineapple filled one because she likes pineapple cakes. :)


My moon cake is a Taiwanese style.


It is filled with green bean paste and dry shredded pork. It sounds weird but the salty sweet is very light and yummy! I really like it! And my mom says that this bakery makes it year round instead of just on holidays. Yea! :) 

Now, there are a lot of non-traditional moon cakes for the younger generation. Some even have Hello Kitty on it. :p I used to like red bean or lotus with an egg yoke but I think I've found a new favorite. :)

I hope you guys looked up at the beautiful full moon tonight! 
Happy Mid-Autumn Moon Festival! :)


Thursday, September 27, 2012

Pineapple Angel Food Cupcakes

I saw this really easy recipe for a Pineapple Angel Food Cake and had to try it for my friend's birthday. I ended up using the exact same ingredients as she did but I wanted to make mine into cupcakes.

This picture is from her blog.
Here are how mine came out.


I ate one hot, right out of the oven. The top was crunchy and sweet because of caramelization of the pineapple juices. It was ok, not too much pineapple flavor. So, I ate another one after they had cooled. It tasted a little better. But I wanted more flavor. Therefore, I had to eat a third one but with chocolate whipped frosting on it. hehe It was ok too.

After eating 3 of them, I have to be honest. I don't know if I like them. 

I did not read the side panel of the box or I would've known exactly how to cook them as cupcakes. Usually cupcake instructions are on the back along with the other instructions so I just thought that you shouldn't make them into cupcakes. Stupid me because I didn't cook them at the right temperature. I will have to try them again but cooking them at the right temperature and time according to the box instructions. What I did was cook them at 350 degrees and checked them after 15min. They were done but as soon as they left the oven, they deflated. :(


I tried 2 other cakes and now I know why they say don't spray the pan because Angel Food cake needs to climb to be nice and fluffy. As you can see, the one in the loaf pan with the parchment paper deflated horribly.

My mom likes it because she likes pineapple and she doesn't like anything too sweet. They are light too.

I might just stick to my pineapple whipcreme pie. :p But that's for another post. hehe

Tuesday, September 25, 2012

Crocheting for a Cause

I whipped up all of these goodies for the Sept 29th Soldier's Angels Baby Shower for the Marine 1st Recon wives. I had a lot of fun trying out all these cute baby hat patterns but I think it's time for me to do something else. What else? I have no idea. I have some ami on my list and some jewelry. But that's my to do list so who knows when I will get to that. hehe Stay tuned. :)


1. Tricycle Diaper Cake
2. Dragon Baby Hat
3. Baby Bear Hat
4. Pink Baby Girl Hat
5. Shell Stitch Beanie
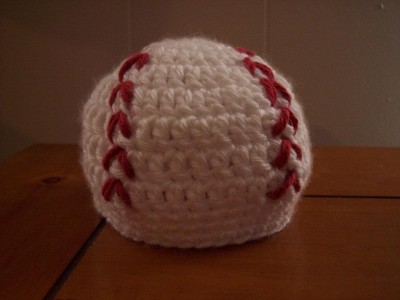
6. Baby Baseball Hat
7. Purple Flower and Grey Pacifier Pouch
8. Green Pacifier Pouch
9. Football Baby Earflap Hat
10. Baby Bunny Washcloth
11. American Flag Newborn Hat
12. Granny Stitch Preemie Hat

I have posted about each piece individually but I didn't want to link them here. You can find them all in the archives. :) Congrats to all the new moms!

Friday, September 21, 2012

Tricycle Diaper Cake

I've always wanted to make a diaper cake but at my first baby shower, her sister made one. It was cute but I was happy when I had an excuse to make one myself. :)


There are a lot of tutorials on the web on how to make one but these two seemed the easiest to understand and most complete: Diaper Motorcycle tutorial by Sweet Aprils and Tricycle Diaper Cake Tutorial from Maiden D'Shade. I looked for the Tricycle diaper cake tutorial when I was starting to put mine together but couldn't find it until after I was done. :p  So, I didn't put the front wheel between the two back wheels. I also couldn't get it to fit right so I just put the back 2 wheels together. :p hehe 

For next time, put a paper towel or toilet paper roll core in the center of the cake pan or use a plain bunt cake pan. It will make it easier to shape the diaper wheels. :)

Materials:

- Glad Press'n Seal Wrap (to cover the diapers to protect them from dust and dirt.) 
I wanted the mom to be able to use the diapers as long with everything else.

- Baby Bottle for the Head Light

- Diapers, size 1  for the wheels

- 2 bibs for the front bumper and seat

- 2 receiving blankets to tie it all together

- Teddy Bear as the rider

- String to help the receiving blankets hold everything together
- Ribbon to keep things together and as a decorative touch
- Toilet paper roll core to give the handle bars structure
- Double sided Tape to help hold it together

What I made:
- Angel Washcloth (Wrapped around the baby bottle)
-  Baby Hat in the baby bottle
- Baby Mittens for the handle bars

If you want to see how I wrapped it, keep scrolling below. :)

Panda's Tip of the Day:


I made a base for the diaper cake to sit on to give it more structure and stability instead of just wrapping it as is. I used double sided tape to make sure it didn't shift during transport. :)
Next, I wrapped everything with the cellophane wrap, added the shreds, and tied everything with ribbon. :)

I hope the lucky Marine wife and mom to be loves it and uses it. hehe

Thursday, September 20, 2012

Crochet Shell Stitch Beanie

I needed one last beanie to replace the one I put into the diaper cake and All About Ami posted about this cutie. So, I had to try it out. :)


Yarn: Caron Simply Soft
Hook: 5 mm
Pattern: Shell Stitch Beanie by the Dainty Daisy
My Adjustments:
Round 1: Magic circle
Rnd 8-14: Instead of chain 3, I use the "fake double crochet"
Round 16: Crab stitch aka Reverse single crochet
Circumference: 5.5 inches
Height: 4.5 inches

Monday, September 17, 2012

Crochet Angel Washcloth

I am putting together something special for the Marine wives baby shower, but you will have to wait for another post. I've finished it but I will post about it on another day. :) Anywho, I needed a washcloth for it and found this really cute pattern for an angel washcloth. I think it's so sweet!


Yarn: Caron Simply Soft
Hook: 4.25 mm
Findings: 20in diameter rubber hair tie
Pattern: Angel Dishcloth
Adjustment: Row 7 for me was 20 - 30 - 20, somehow I ended up with less total stitches
Time: About the amount of time to watch 3 episodes of Warehouse 13 with some distractions
Tip: Crochet over the ends of your yarn while you work or you will have lots of weaving at the end. I didn't have to do any weaving this time because any loose ends, I crochet over while doing the edging. ;)

Stay tuned for more cuteness! :)

Sunday, September 16, 2012

Quick Crochet Flower Coaster

I've been drinking a lot of ice water lately to cool down. The only problem is that the condensation creates that water ring on whatever it touches. I don't want my wood to get damaged and I don't want my crafting supplies to get wet. Solution, crochet a coaster. :)


Yarn: Lion Brand Vanna's Choice
Hook: 6 mm
Pattern: Springtime Coasters by Whiskers & Wool
I did not chain 3 to move up to the next round. I did a fake double crochet. I will post the tutorial later. I really like this fake out because there's no seam which is nicer.


It works well and the best part is that it fits all sizes of mugs and cups. :)
If you want it really water proof though, I would glue a round piece of cork to the underside.

I hope you all had a very nice weekend! 

Tuesday, September 11, 2012

Never Forget

Always Remember...
I don't just remember on this day that we have heroes all around us. People whose jobs are to  protect and serve, who put their lives on the line for the rest of us. Military, firefighters, and even the police are all doing some of the most dangerous jobs. We should never forget.

There are heroes all around us. Everyday people with family and friends who work 9 to 5 jobs but who would give their lives for strangers. And I believe those people who dedicate their lives to charity are also heroes in their own right. They help those who cannot help themselves, those people regular people do not want to think about. They are also heroes.

And let's not forget the dogs who cut their paws looking for survivors. The military and police dogs who also keep us and their handlers safe. 

Thank you all for your hard work and sacrifice. We will never forget.
Thank you to your family and friends for their pain and sacrifice. They didn't get a choice but we must remember, that they are the ones who have to live with the memory of those heroes. They are the ones who made those heroes who they were. They are the ones who taught them to have the courage to give their lives for others. 

Today has been dubbed "Patriot Day" and I don't think I will use it. While as the years go by, we will be able to sing more than cry for our heroes and loved ones lost that day, I don't think I will want to say "Happy Patriot Day". Also, I think we should all be patriotic every day, not just today.
File:9-11 Memorial Project - California.png

California has a memorial project also for 9-11. Most people do not remember that those planes were bound for California, that most of those passengers work and live here.

I was able to see a part of the World Trade Center here in California.


I can't explain how I felt seeing it. I definitely want to go to New York one day and pay my respects in person. Even though I was lucky enough not to lose someone that day, it still has touched me and my life.

I want to leave you with this from Exceptional Living.

In a New York classroom one year after 9-11, students composed the following 9-11 poem. A relative of the teacher had perished on that tragic day in Tower One of the World Trade Center. The victim left behind a 3-year-old.

List of “Don’t Forgets” and “Remembers”

Before September 11th, we would wake up with a list of “Don’t Forgets”
Don’t forget to wash your face
Don’t forget to brush your teeth
Don’t forget to do your homework
Don’t forget to wear your jacket
Don’t forget to clean your room
Don’t forget to take a bath

After September 11th, we wake up with a list of “Remembers”
Remember to greet the sun each morning
Remember to enjoy every meal
Remember to thank your parents for their hard work
Remember to honor those who keep you safe
Remember to value each person you meet
Remember to respect other’s beliefs


Always remember to tell the people you love you love them. Always remember to appreciate those in your life and try not to take advantage of their love. Always remember, you are important and you touch the lives of everyone you meet.

Thank you all for touching mine. :)

Sunday, September 9, 2012

Tapestry Crochet Experiment

I saw something cool and decided to try it, Tapestry Crochet. This is where you change colors in the middle to form pictures. I wanted to see if I could make the pacifier pouch cuter. Here is what I came up with.


Used the 2-color fussier version of the pacifier pouches I have been making,  row 1 and 2. Then I just sc all the way around in the chart pattern below.

I worked this chart from the bottom up. And yes, this is a cross stitch chart.


I crochet in the round so I didn't have to worry about which way I was crocheting or looking at the chart. Because I carried the yarn to switch colors, the pouch turned out to be too small for a pacifier. It is also tight and not stretchy. I am going to use it as a change holder instead. I still have to add the button.

My Changes: To My changes
Flap closure instead of just a button and loop
Row 1: sc across, ch 1, turn
Row 2: slip stitch across in each sc, ch 1, turn
Row 3: sc across, ch 1, turn
(sc the sc from Row 1 and slp st on top from Row 2 together
aka going under sc from row 1 but over slp st from row 2)
Row 4: slp st across
Row 5: sc dec, sc across, sc dec
(Cannot use invisible dec)
Row 6: sc, hdc, dc, tc, tc, dc, hdc, sc
(space btw 2 tc becomes the button hole)
Row 7: reverse sc aka crab stitch across

Here is another chart you could use for something larger.


Panda's tip of the Day:
I found this great pic to help us all with the symbols on yarn labels. :) I hope this helps someone. :)
Pinned Image
Add caption


Saturday, September 8, 2012

Crochet Sunshine Scalloped Cowl

I just found out one of my best friend's favorite color to wear which made me run to my yarn stash and see how much of the color I had. Sadly, it was not a lot. Next, I went to my computer to look for patterns that do not take a lot of yarn. Of course I searched cowls. Here is what I found. :)


Yarn: Lion Brand Vanna's Choice
& Lion Brand Vanna's Glamor
(I held both yarns together and crochet with them both as one.)
Hook: 6 mm
Circumference: 20 in
Width: 4.5 in
Pattern: Scalloped Cowl by Lion Brand
(Stopped at row 3 for each side because I didn't have enough yarn.)
Finished 9-6-12


I promise you, in real life, the difference in yarns is not as noticeable. The Glamor just adds a little sparkle. :)

Lion Brand does this a lot, they post the same pattern but changed it a little for different yarns in their line with different thicknesses. Here is the same pattern but more foundation chains for a thinner yarn.

Anywho, this is going to be a birthday present for one of my best friends here in Cali. :) Her bday is still a month or two away but I wanted to try it out. hehe

Quick Crochet Flower

I have all of these flower crochet patterns to try out so I can find my favorite to put on these cute little baby girl hats. Here is one of the first. :)


Yarn: Lion Brand Vanna's Choice
Hook: 5mm
(I don't know how I'll go back to small hooks and tight stitches for the ami...hehe)
Pattern: Crochet Flowers from Skip to My Lou
I used the same yarn and hook size. I did not change the pattern at all. O.o

Except, after finishing the flower, I didn't like it. No offense.
There were too many holes you could see so, I didn't want to put it on something.


As I was tucking in the ends, I realized that it would fit a tea light perfectly.
Viola!!! It is re-purposed as a tea light holder. :) And I really like it. hehe
Of course I will be using battery operated tea lights for safety. :p


Panda's Tip of the Day:
I guess this is more for me than you but it is always nice when I remember to crochet in my ends instead of having to sew them all in at the end. :)


Friday, September 7, 2012

Crochet Baby Baseball Hat

I had made a Football Baby Hat so I wanted to do a Baseball Hat. :)


Aww...someone wanted to try it on. I think it's a little big for him though. :)


Yarn: Caron Simply Soft
Hook: 5mm
Circumference: ~12 in
Height: 4in
Pattern: Army Newsboy Newborn Hat by Stitch 11
I made it in all white.
My Changes: Brim: I ch1 before turning at the end of the rows.
(It makes turning easier but my brim didn't turn out so nice.)

Note:
I will have to make this hat again and see what I can do better. :p
I also did not like the slip stitch border because it made the hat less stretchy.

Panda's Tip of the Day:
I used some spare green yarn to do a running stitch where I wanted the red stitches of the baseball to go. It makes it easier to keep the baseball stitches in the right place. I am not good at free hand. :)


Other Crochet Baby Baseball Hats! :)


This one is by the same lady, Stitch 11, who has a free pattern for this hat on her blog.


If I do make another one, I would like to change the color of the brim and edging.
This one is super cute! And there's a free pattern but in diagram form!

Thursday, September 6, 2012

Crochet Butterfly Newborn Hat

This hat is cute, easy, and quick to whip up. It took me about an hour. :)


Yarn: Caron Simply Soft
Hook: 5mm
Circumference: 11-12 in
Height: 4 in  
Pattern: Butterfly Hat - Newborn by Alli Crafts
No Changes! OMG! hehe But I really don't like working in rounds because the chain 3 join at the end of each row makes for an ugly seam. I take the tail and sew up the seam so it is not so obvious.


Panda's Tip of the day:
Make the last ch in your ch 3 a little looser, it will make it easier for you to join at the end of the row.